Testing rules in a rule engine is not quite the same as testing code. Verifying correct behavior and results in simple rule applications can be as simple as a quick glance at irVerify and the Rule Engine Feedback tab. But more complicated rule applications take the place of so many lines of code that it’s likely you’ll want to test only a portion of those ruleapps at a time. To help all users of InRule, I’ve listed some of the ROAD Team’s best practices with testing tools along with some “pro tips.” I’ve also organized the tools into “primary” and perhaps lesser known “secondary” tools. Feel free to comment with any questions you have.
Primary Testing Tools
Obviously irVerify is your first and main location for testing rules. However, you have a wide variety of options for testing rules within irVerify. Notably, you should be aware of the following tools:
- Rule Engine Feedback: Because the rule engine develops its execution agenda in a dynamic manner based upon input data and other factors, you should absolutely know that the Rule Engine Feedback is your first place to identify the order that the rule engine executed rules and calculations.

-
- Pro tip: Use the “Copy All” command on the feedback and then paste it into Notepad ++ or a similar tool to get a better read on long lists of feedback.
- Pro tip: Getting good at reading the order of operations is—in many cases—all you need in order to actually diagnose even complex rule applications with thousands of lines of feedback.
- Pro tip: Numbers matter in the engine feedback, especially when identifying which collection members were assigned to which values.
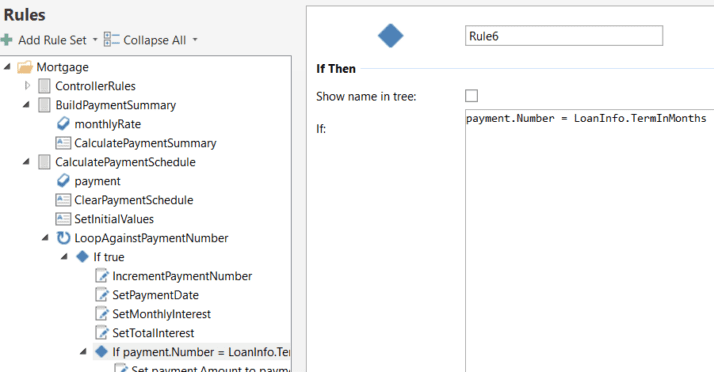
- Pro tip: “Rule6” in the above screen image refers to the syntax name of one of the rule constructs within a business language rule. In order to identify the underlying rule, convert the BL rule to syntax in irAuthor and then identify the “Rule6” rule (see the following screen image). Be aware that you can rename this rule before converting back to BL.

- Rule Tracing: Rule tracing must be enabled before clicking Apply Rules (Note: Having Rule Tracing turned on will slow down rule execution by as much as 100% in irVerify.), but your rule trace will provide you with an insightful and detailed log of all calculations and decisions made by the rule engine.
- Pro tip: Do not use rule tracing unless you need to determine why a value was set. Try following the rule execution in the rule engine feedback first.
- Pro tip: Remember to turn rule tracing off when you’re done! This button will stay pressed in even after you exit / reenter irVerify if you do not manually turn it off.
- Regression (Comparison) Tests: Found on the right side of irVerify’s toolbar, these have already been covered in some depth by my colleague Alan Holley. Please check his insightful blog post for more details.
- Pro tip: Start with Comparison tests and then add Assertion tests only later if you find you need them.
- Pro tip: Performance tests in irVerify can be very useful for determining a baseline for rule application performance in an isolated environment. But this is not meant as a substitute for fully integrated end-to-end performance testing when rules are executed in an integrated environment (with the benefits of better hardware and a warm startup).
Secondary Testing Tools
- Notifications: Create fire notifications to show the runtime values of your variables. View these notifications post-runtime in the Notifications tab at the bottom of your irVerify session.
- Pro tip: If your logic contains upstream triggers (ex: Boolean flags with dynamic values whose settings cause later rules to run), use notifications in your branching logic to identify that these branches are running. Your QA team will love you for it.

- Pro tip: If your logic contains upstream triggers (ex: Boolean flags with dynamic values whose settings cause later rules to run), use notifications in your branching logic to identify that these branches are running. Your QA team will love you for it.
- Enable / Disable rules or calculations: Do not forget that you can disable rules or calculations if they are interfering with your investigation of another rule. Disabled rules are not part of the compiled rule application in irVerify.
- irVerify’s Reset button: Not enabled by default, the Reset button can reset this session of irVerify to its pre-testing data state. This is useful when testing two alternating branches of an If / Then / Else rule, or in any other similar scenario.
- Pro tip: To enable the Reset button, in irVerify, go to the File Menu, then the Options button. Then select the bottom option for “Enable test data reset.” You will then need to relaunch irVerify to use this feature.
- Halt command: If you have a more complex rule application, but you need to investigate the execution up to a certain point, consider dropping a Halt action (halt all rule execution) into a strategic location within your rules. With irVerify halted, you should be able to visually examine all of the current runtime values of your data prior to moving to the next step in your processing.

- Pro tip: If you’re still troubleshooting, drag this Halt action around to wherever you need it. You can place this Halt action just about wherever you need it in the rule application.
Are there any other irAuthor or irVerify tools that you’ve discovered that didn’t make my list? Feel free to add comments below and let others know of any other useful tips! Happy testing!


